> ## Documentation Index
> Fetch the complete documentation index at: https://doc.lwops.cn/llms.txt
> Use this file to discover all available pages before exploring further.
# 部署perseusZ_proxy
## 一,背景
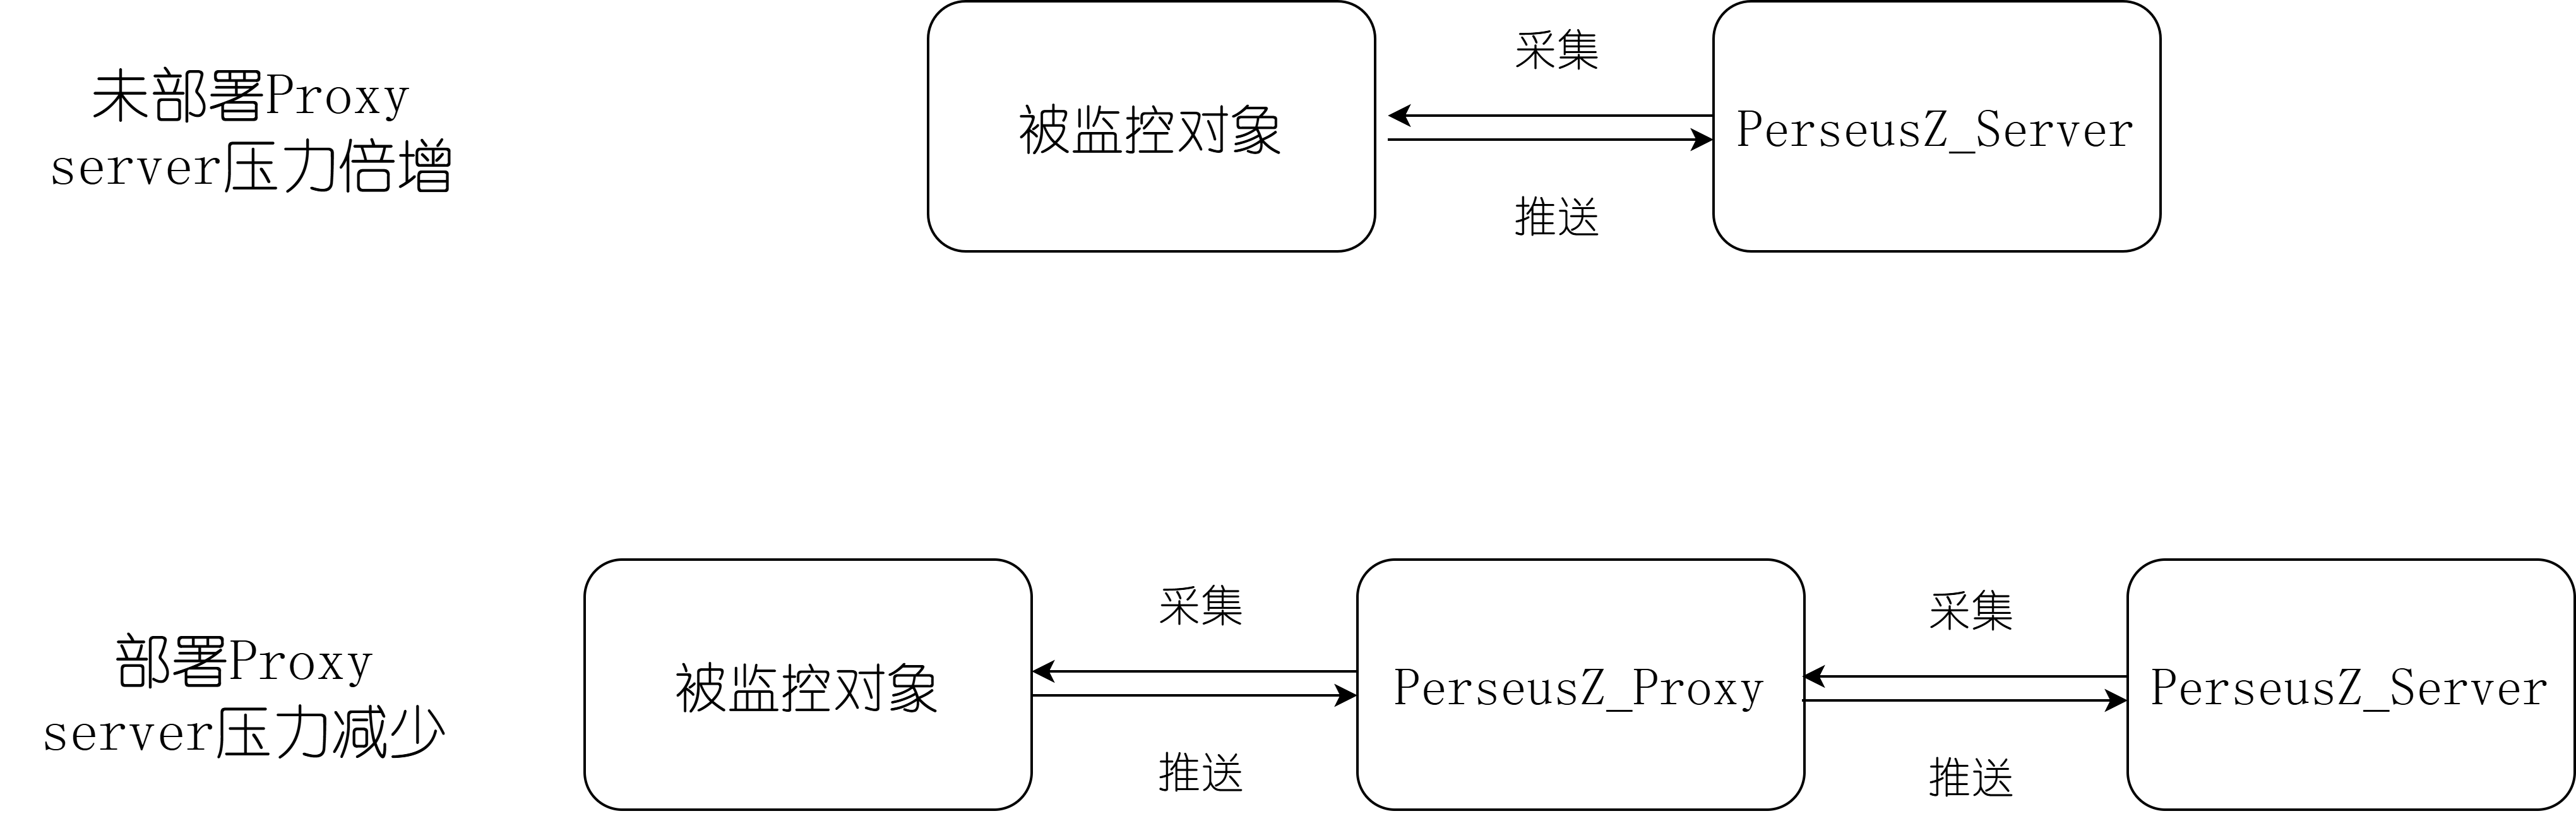
在乐维监控平台下,纳管的数量日益增多,导致server组件的指标数据采集压力倍增,以至于出现数据断断续续的出现甚至无数据,这时候就需要一个proxy来分担server的压力
* **perseusZ\_proxy**: 通讯端口(10051/tcp),用于监控,跨区域网络隔离或扩展性能时使用。
* **代理程序**:通讯端口(8081/tcp),用于程序跨网段等情况,如:
* 添加监控时的`连通性测试`
* 监控概览面板`PING测试`
* 网络拓扑中的`网段配置`
* IP管理中子网的`代理服务器`
* 自动化运维中的`代理服务器`(自动化代理需要服务器上有ansible环境)
* **代理程序**:通讯端口(2110/tcp),用于监控概览页选代理情况的`终端登录`(需要代理启用php程序 `php bin/manager process-console/start`)
## 二,架构图
 ## 三,主机拓扑(样例)
| 主机名 | ip | cpu | 内存 | 硬盘 | OS |
| --------------- | ------------ | --- | -- | ---- | ---------------- |
| perseusZ\_proxy | 172.16.1.213 | 8C | 8G | 100G | Rocky Linux 8.10 |
以上均是最小配置,资源充足可以考虑提升新配置
建议:使用和PerseusZ\_server主机同样的操作系统,并且使用同样的部署包
## 四,上传乐维部署包并解压
下载地址:[免编译部署手册 - 乐维文档](https://doc.lwops.cn/no-compile)
```bash theme={null}
[root@PerseusZ_proxy ~]# ls
anaconda-ks.cfg Platform_Setup_Rocky_Green_Obsidian_8.2_x86_64_zh_CN.tar.gz
[root@PerseusZ_proxy ~]# tar -xf Platform_Setup_Rocky_Green_Obsidian_8.2_x86_64_zh_CN.tar.gz -C /home
[root@PerseusZ_proxy ~]# ls /home/
Platform_Setup
```
## 五,安装PerseusZ\_proxy
1. 设置为手动安装模式
```bash theme={null}
#设置为手动安装模式
sed -i.bak "s/Product_Mode=1/Product_Mode=0/g" /home/Platform_Setup/config.sh
```
2. 开始安装
```bash theme={null}
bash /home/Platform_Setup/install.sh
```
先安装PerseusZ-Server组件
## 三,主机拓扑(样例)
| 主机名 | ip | cpu | 内存 | 硬盘 | OS |
| --------------- | ------------ | --- | -- | ---- | ---------------- |
| perseusZ\_proxy | 172.16.1.213 | 8C | 8G | 100G | Rocky Linux 8.10 |
以上均是最小配置,资源充足可以考虑提升新配置
建议:使用和PerseusZ\_server主机同样的操作系统,并且使用同样的部署包
## 四,上传乐维部署包并解压
下载地址:[免编译部署手册 - 乐维文档](https://doc.lwops.cn/no-compile)
```bash theme={null}
[root@PerseusZ_proxy ~]# ls
anaconda-ks.cfg Platform_Setup_Rocky_Green_Obsidian_8.2_x86_64_zh_CN.tar.gz
[root@PerseusZ_proxy ~]# tar -xf Platform_Setup_Rocky_Green_Obsidian_8.2_x86_64_zh_CN.tar.gz -C /home
[root@PerseusZ_proxy ~]# ls /home/
Platform_Setup
```
## 五,安装PerseusZ\_proxy
1. 设置为手动安装模式
```bash theme={null}
#设置为手动安装模式
sed -i.bak "s/Product_Mode=1/Product_Mode=0/g" /home/Platform_Setup/config.sh
```
2. 开始安装
```bash theme={null}
bash /home/Platform_Setup/install.sh
```
先安装PerseusZ-Server组件
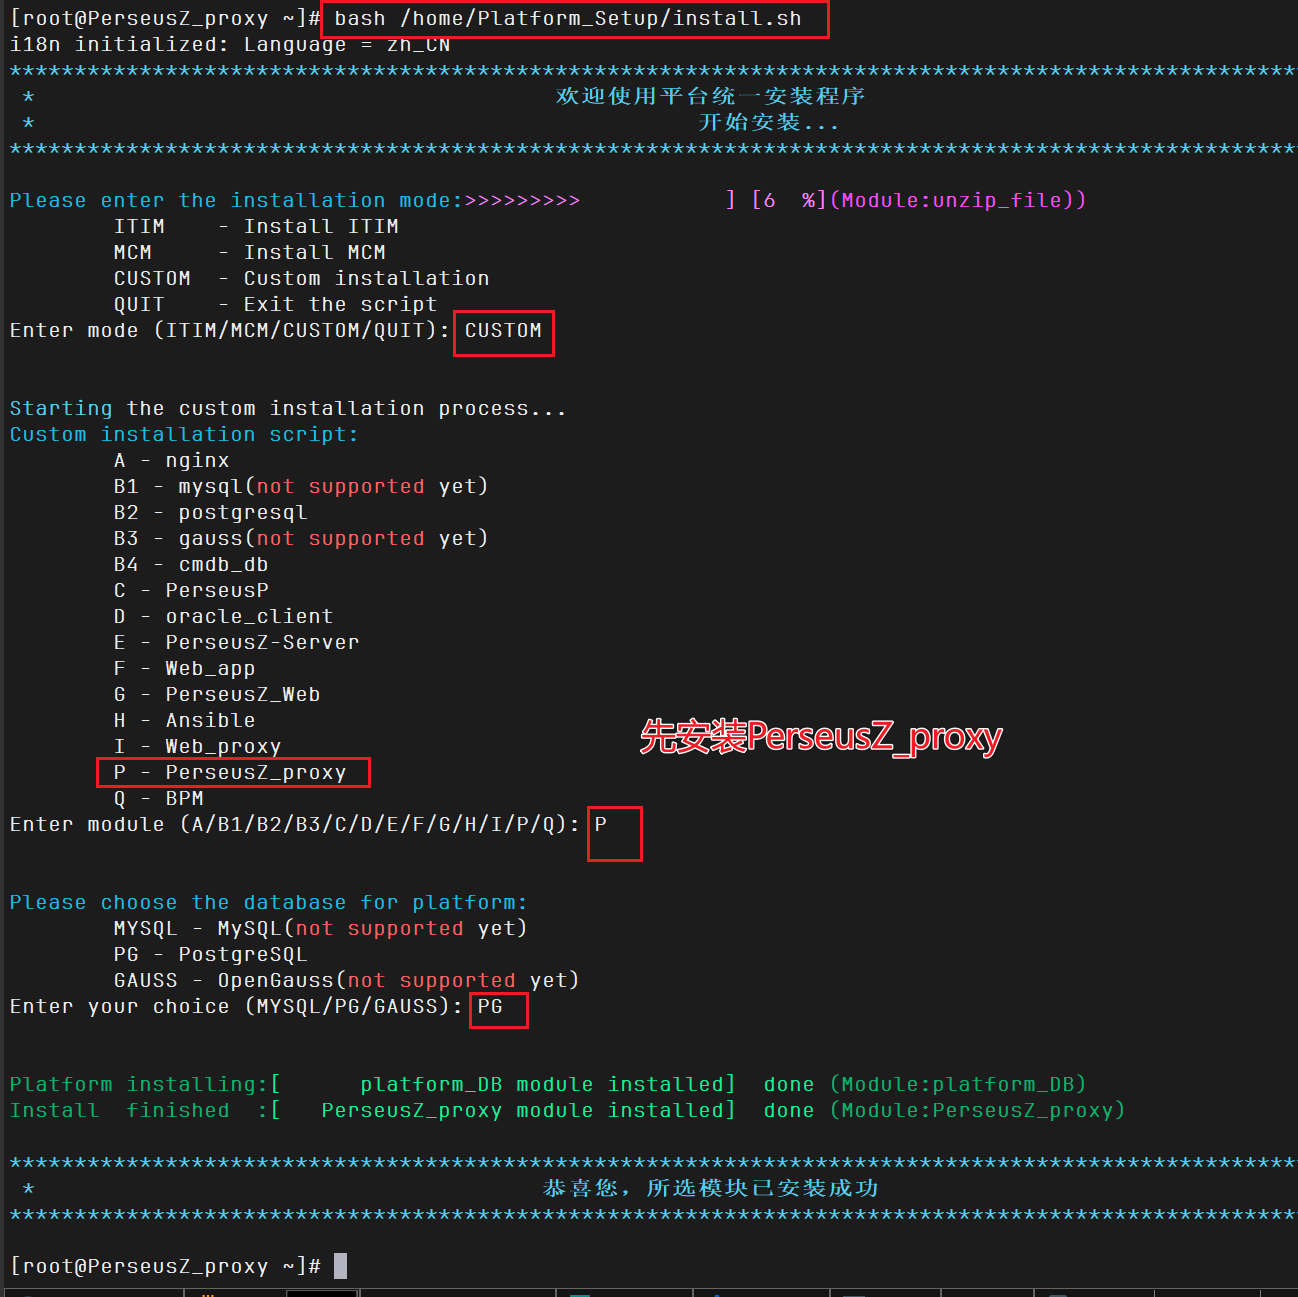 再次进行安装Web\_proxy,PerseusP
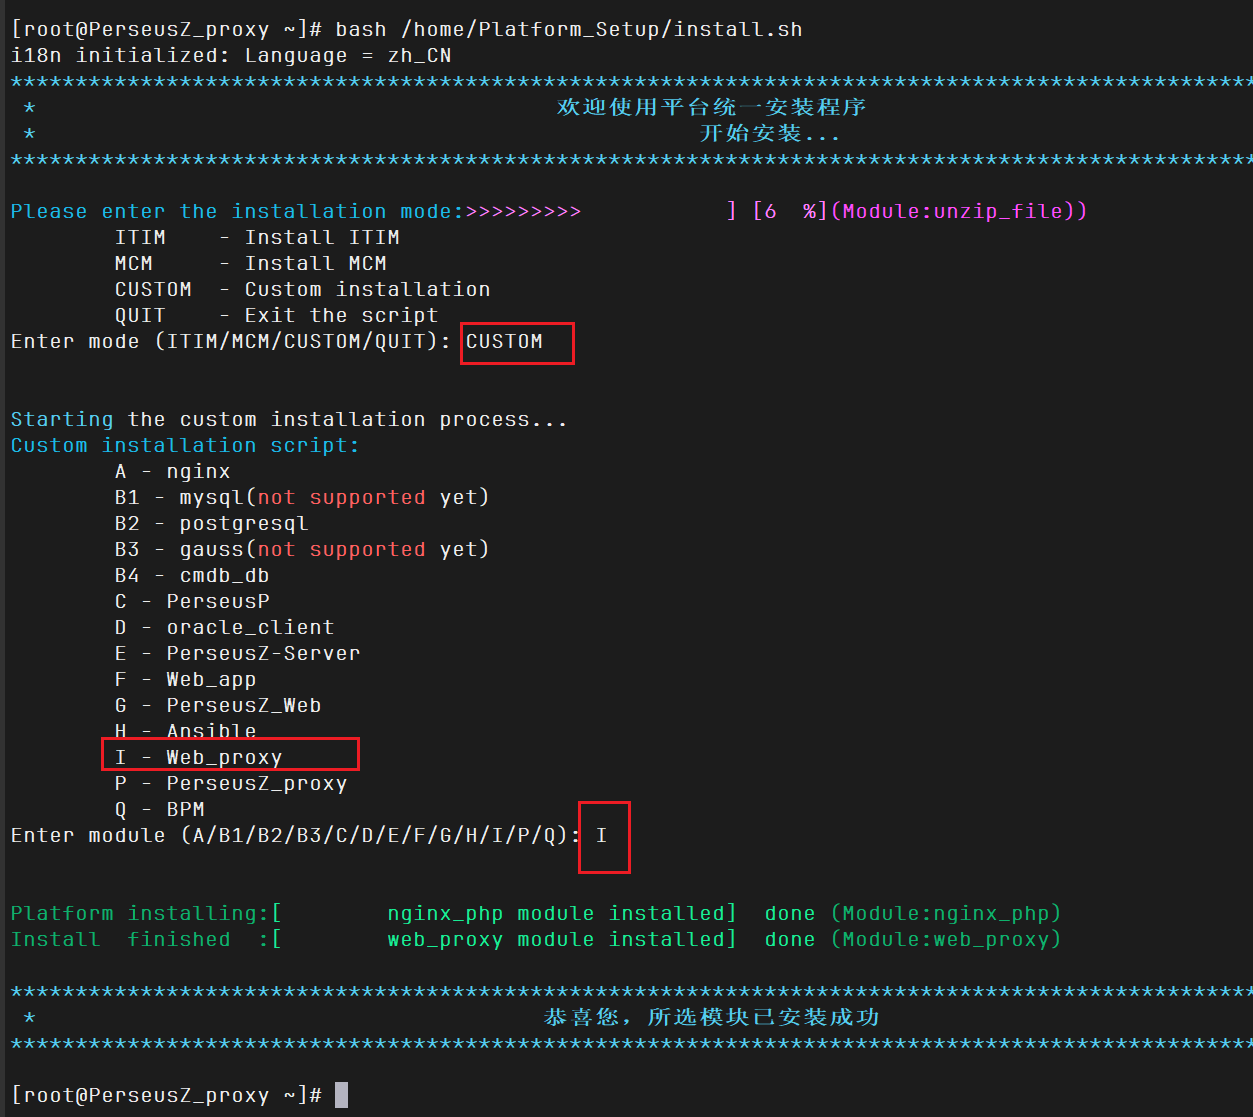
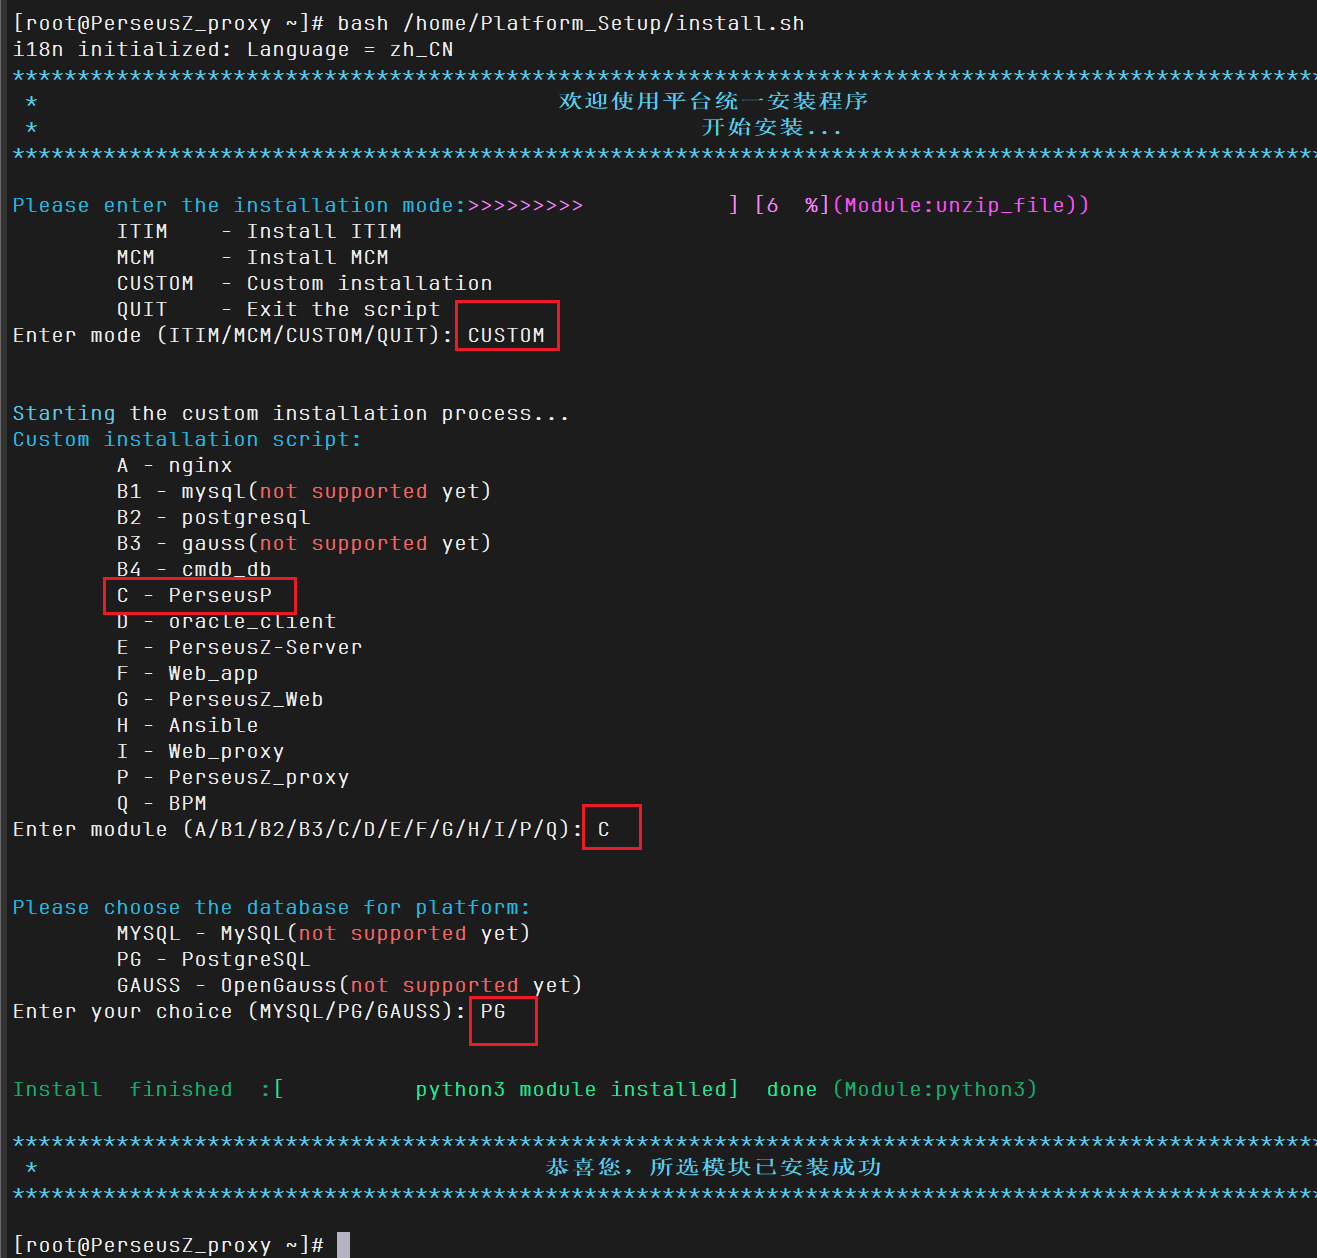 修改回生产模式
```bash theme={null}
#设置为生产安装模式
sed -i.bak "s/Product_Mode=0/Product_Mode=1/g" /home/Platform_Setup/config.sh
```
## 六,修改配置文件指向乐维平台
```bash theme={null}
vim /itops/perseusZ/etc/perseusZ_proxy.conf
```
修改回生产模式
```bash theme={null}
#设置为生产安装模式
sed -i.bak "s/Product_Mode=0/Product_Mode=1/g" /home/Platform_Setup/config.sh
```
## 六,修改配置文件指向乐维平台
```bash theme={null}
vim /itops/perseusZ/etc/perseusZ_proxy.conf
```
 ```bash theme={null}
#重启服务
systemctl restart perseusZ_proxy.service
```
## 七,测试是否正常
```bash theme={null}
[root@PerseusZ_proxy ~]# curl localhost:8081
{"code":0,"message":"ok","data":[]}
#出现ok即表示正常
```
## 八,接入乐维平台
```bash theme={null}
#重启服务
systemctl restart perseusZ_proxy.service
```
## 七,测试是否正常
```bash theme={null}
[root@PerseusZ_proxy ~]# curl localhost:8081
{"code":0,"message":"ok","data":[]}
#出现ok即表示正常
```
## 八,接入乐维平台
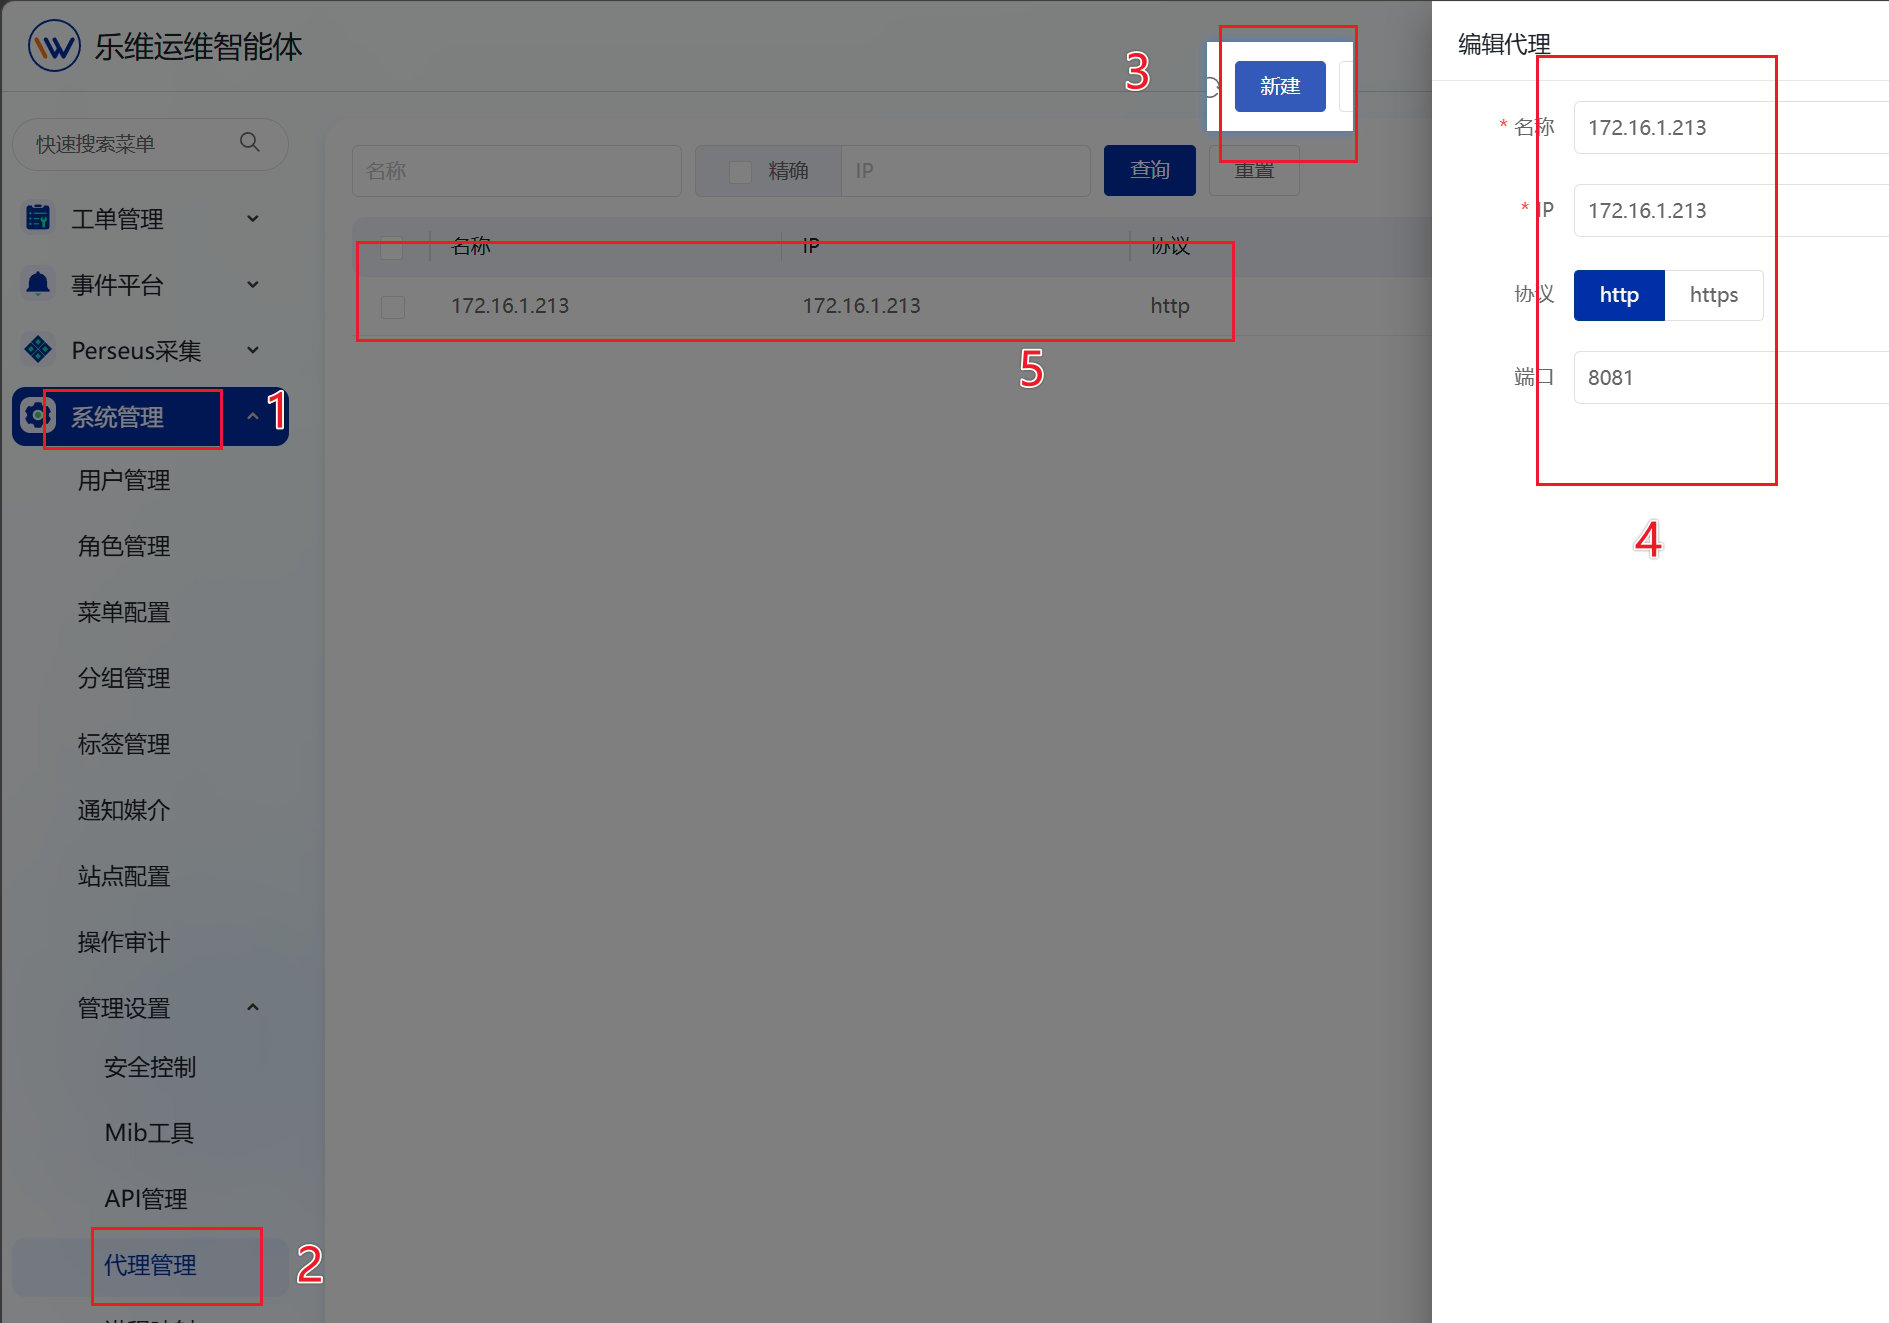
 ## 九,操作系统使用proxy进行监控
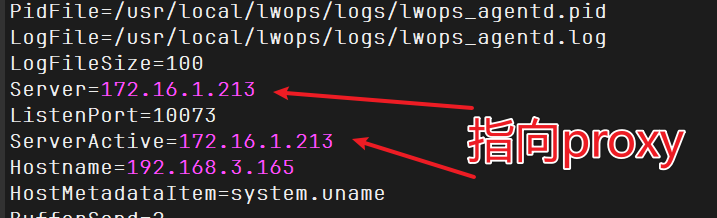
1.操作系统安装完agent之后需要去配置文件改地址指向proxy地址
```bash theme={null}
vim /usr/local/lwops/etc/lwops_agentd.conf
```
## 九,操作系统使用proxy进行监控
1.操作系统安装完agent之后需要去配置文件改地址指向proxy地址
```bash theme={null}
vim /usr/local/lwops/etc/lwops_agentd.conf
```
 ```bash theme={null}
#重启agent服务
systemctl restart lwops_agentd.service
```
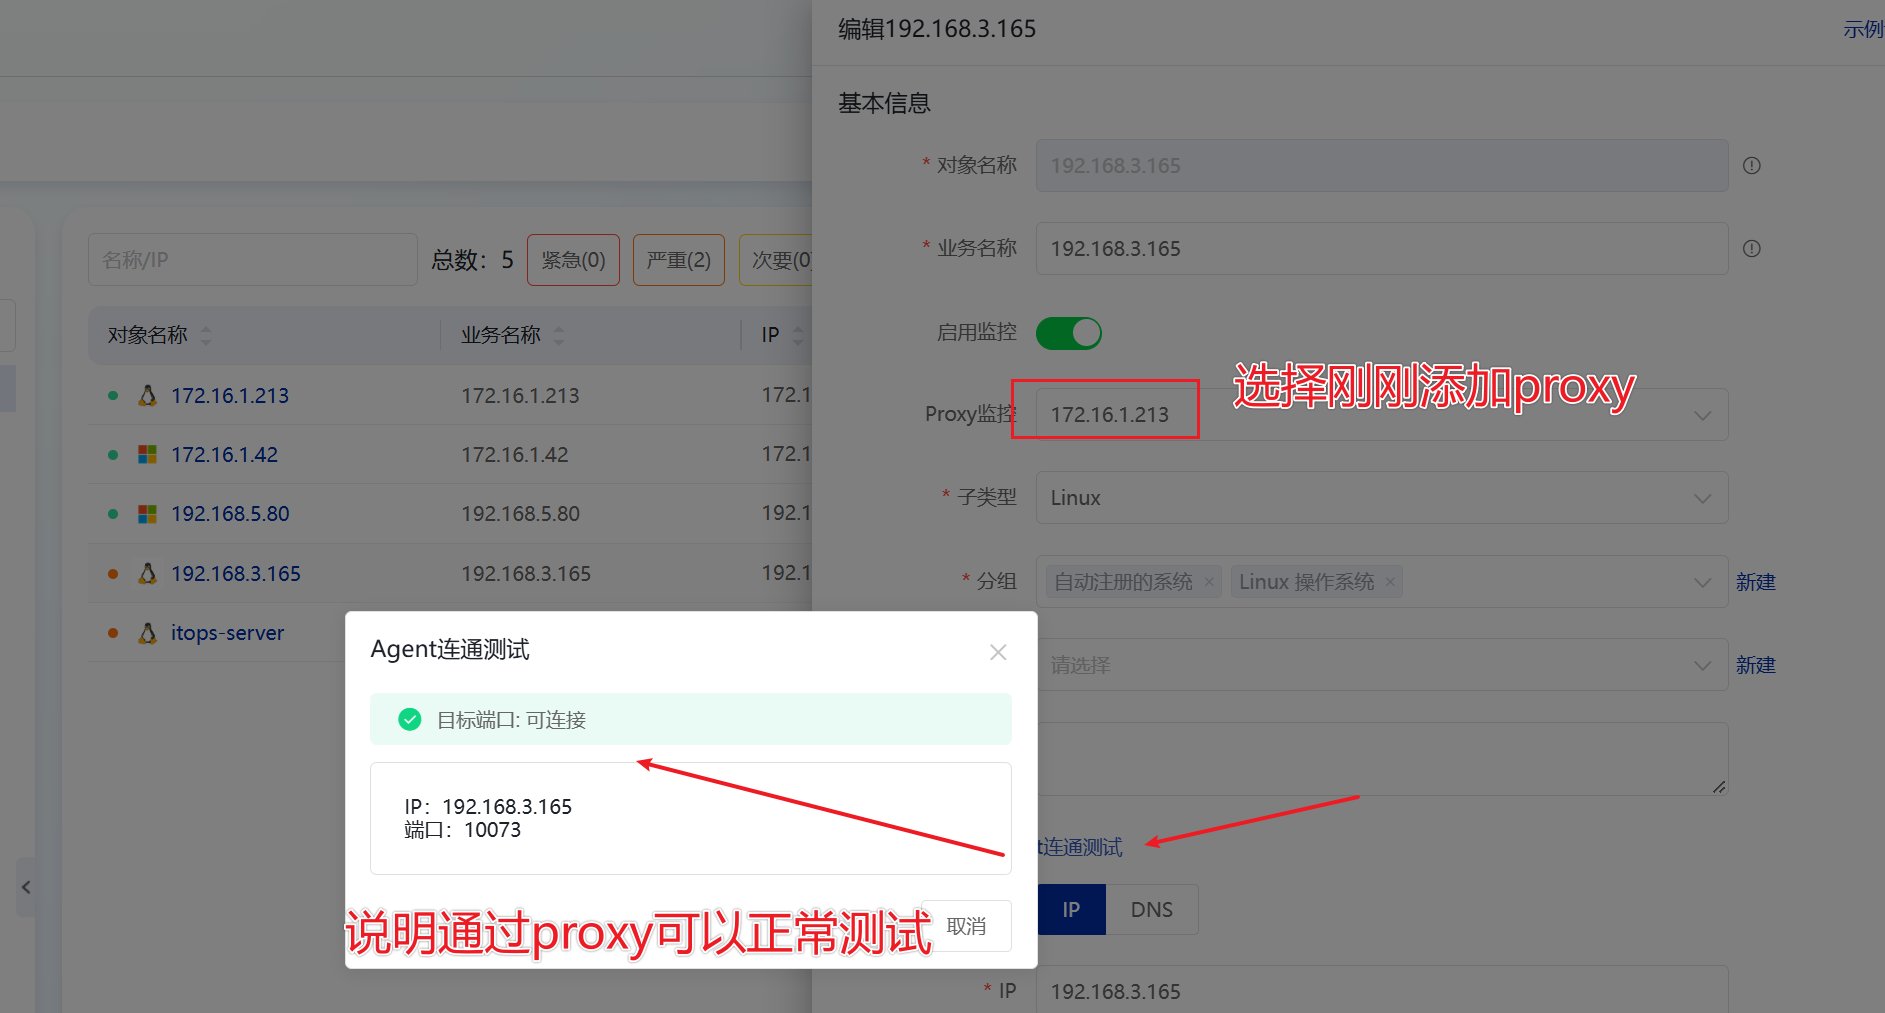
2.页面修改为新的proxy
```bash theme={null}
#重启agent服务
systemctl restart lwops_agentd.service
```
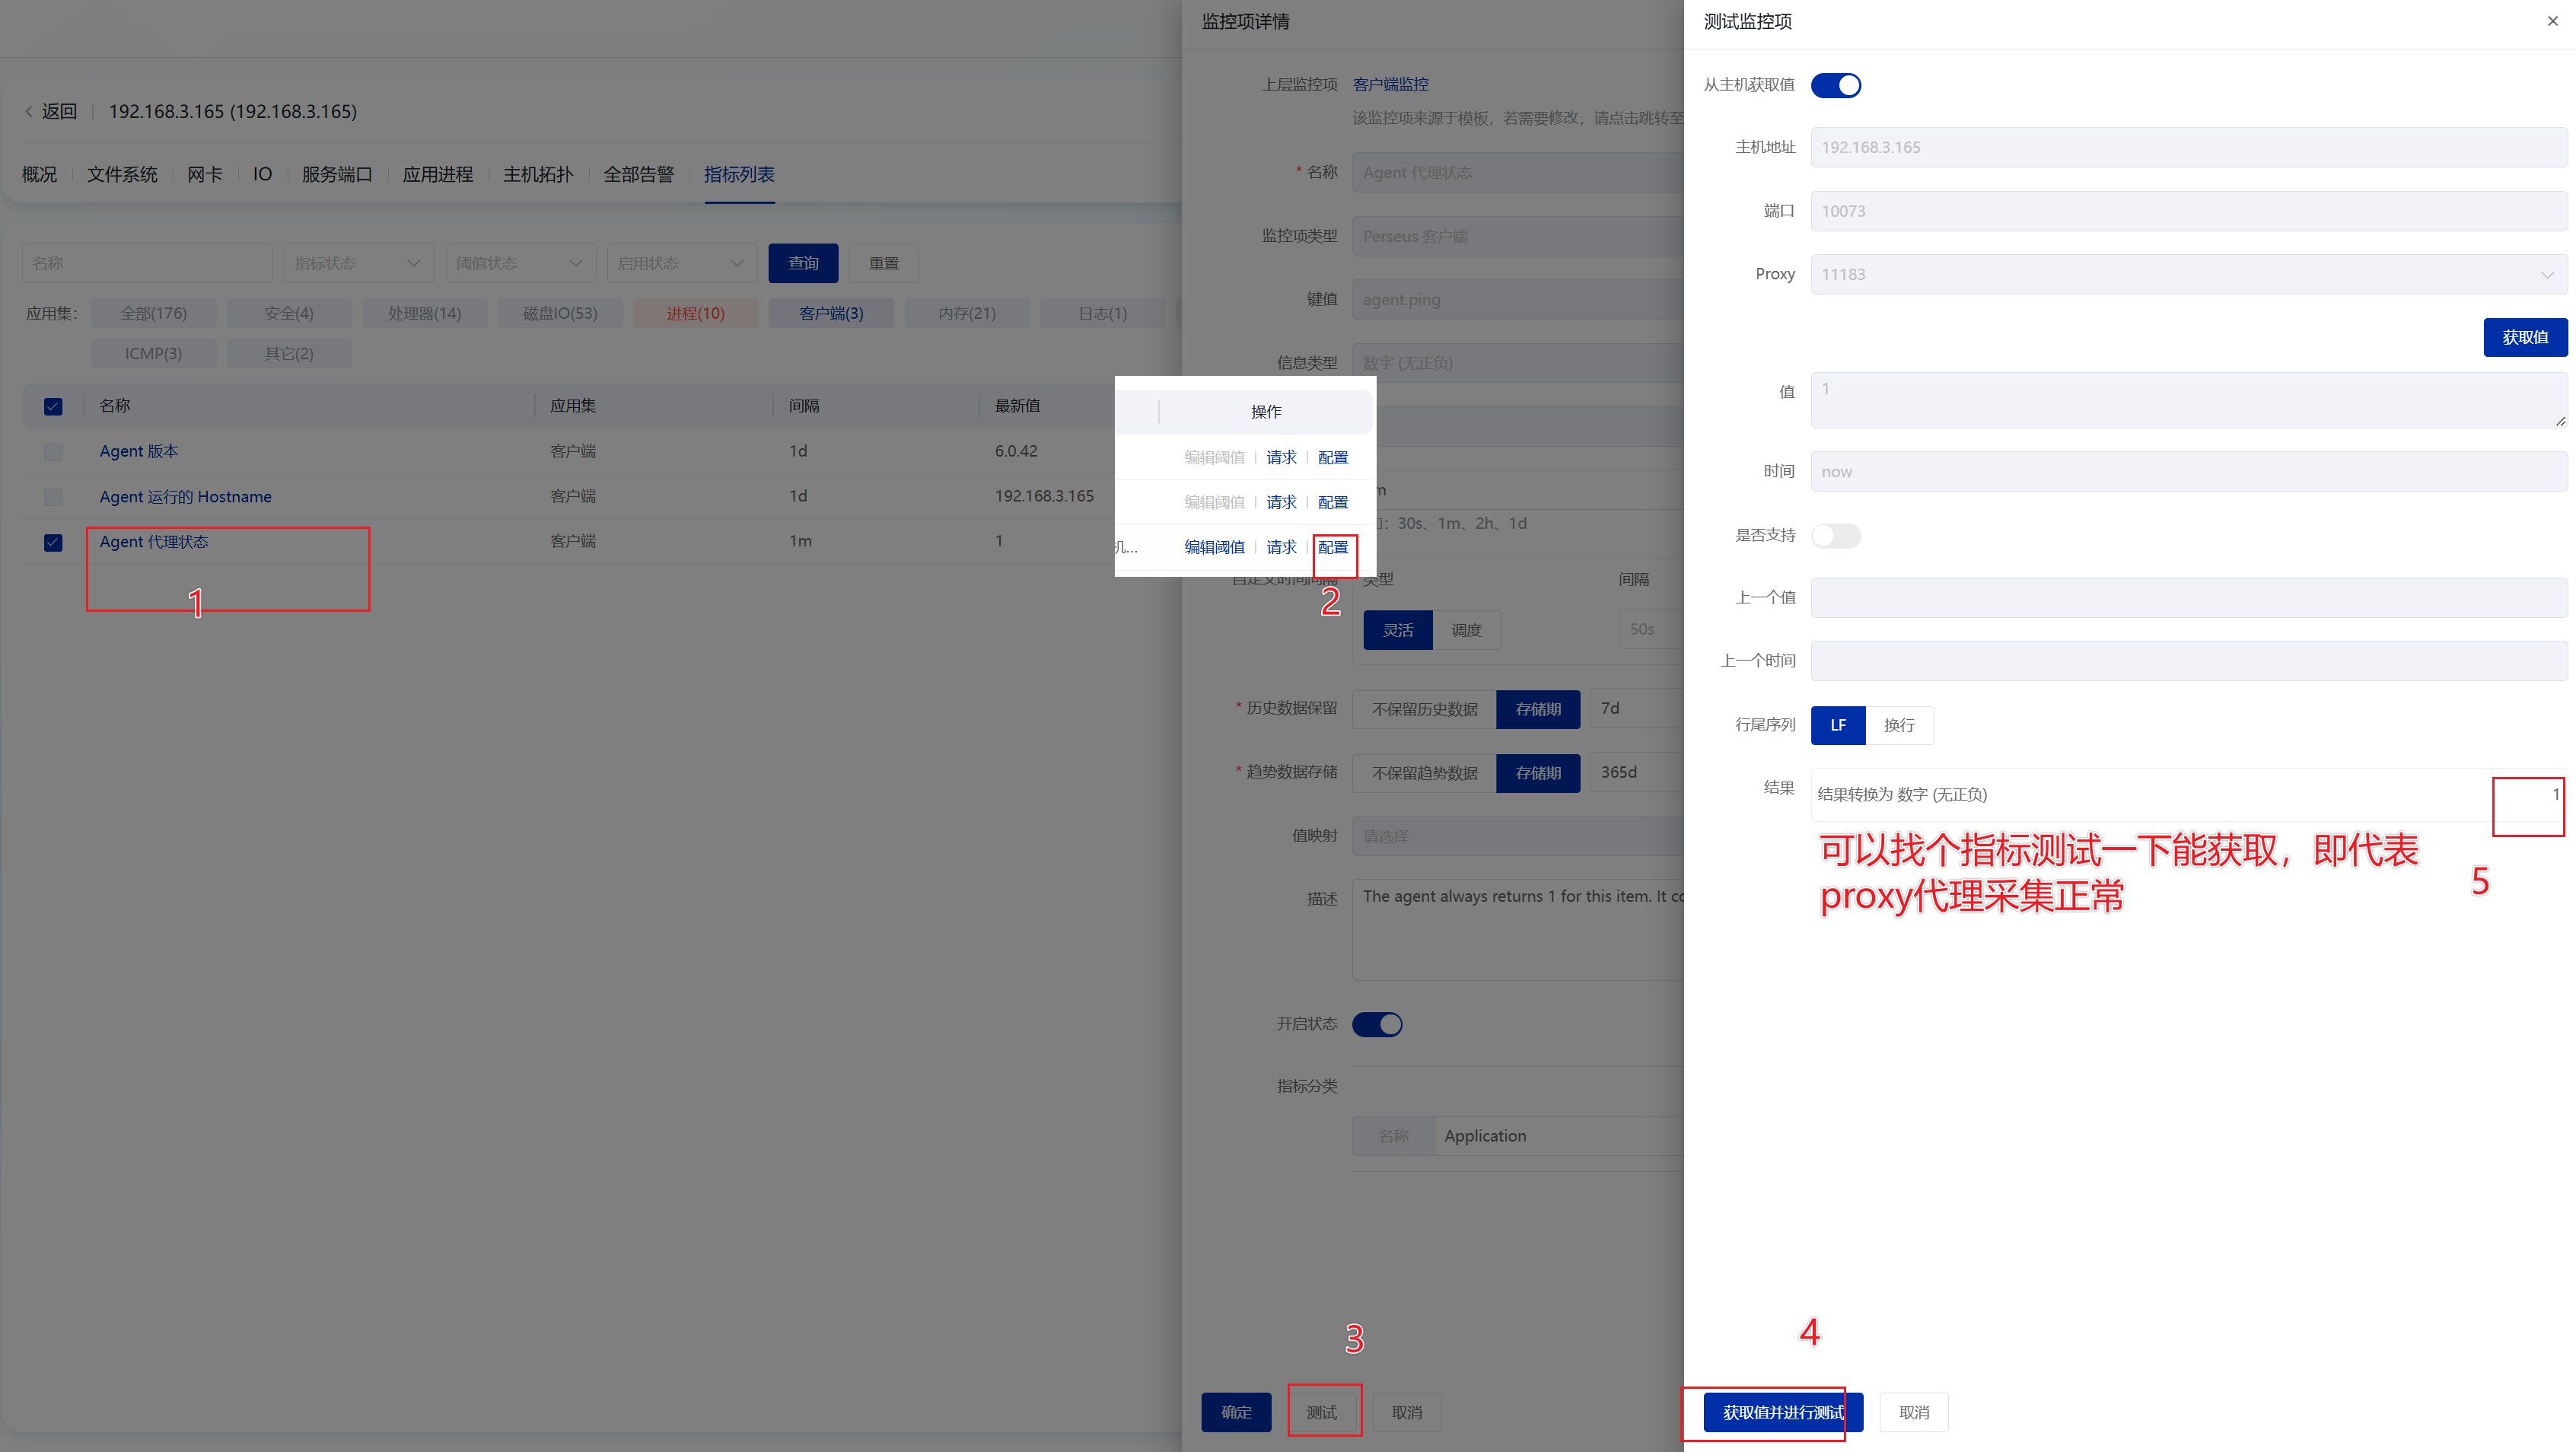
2.页面修改为新的proxy
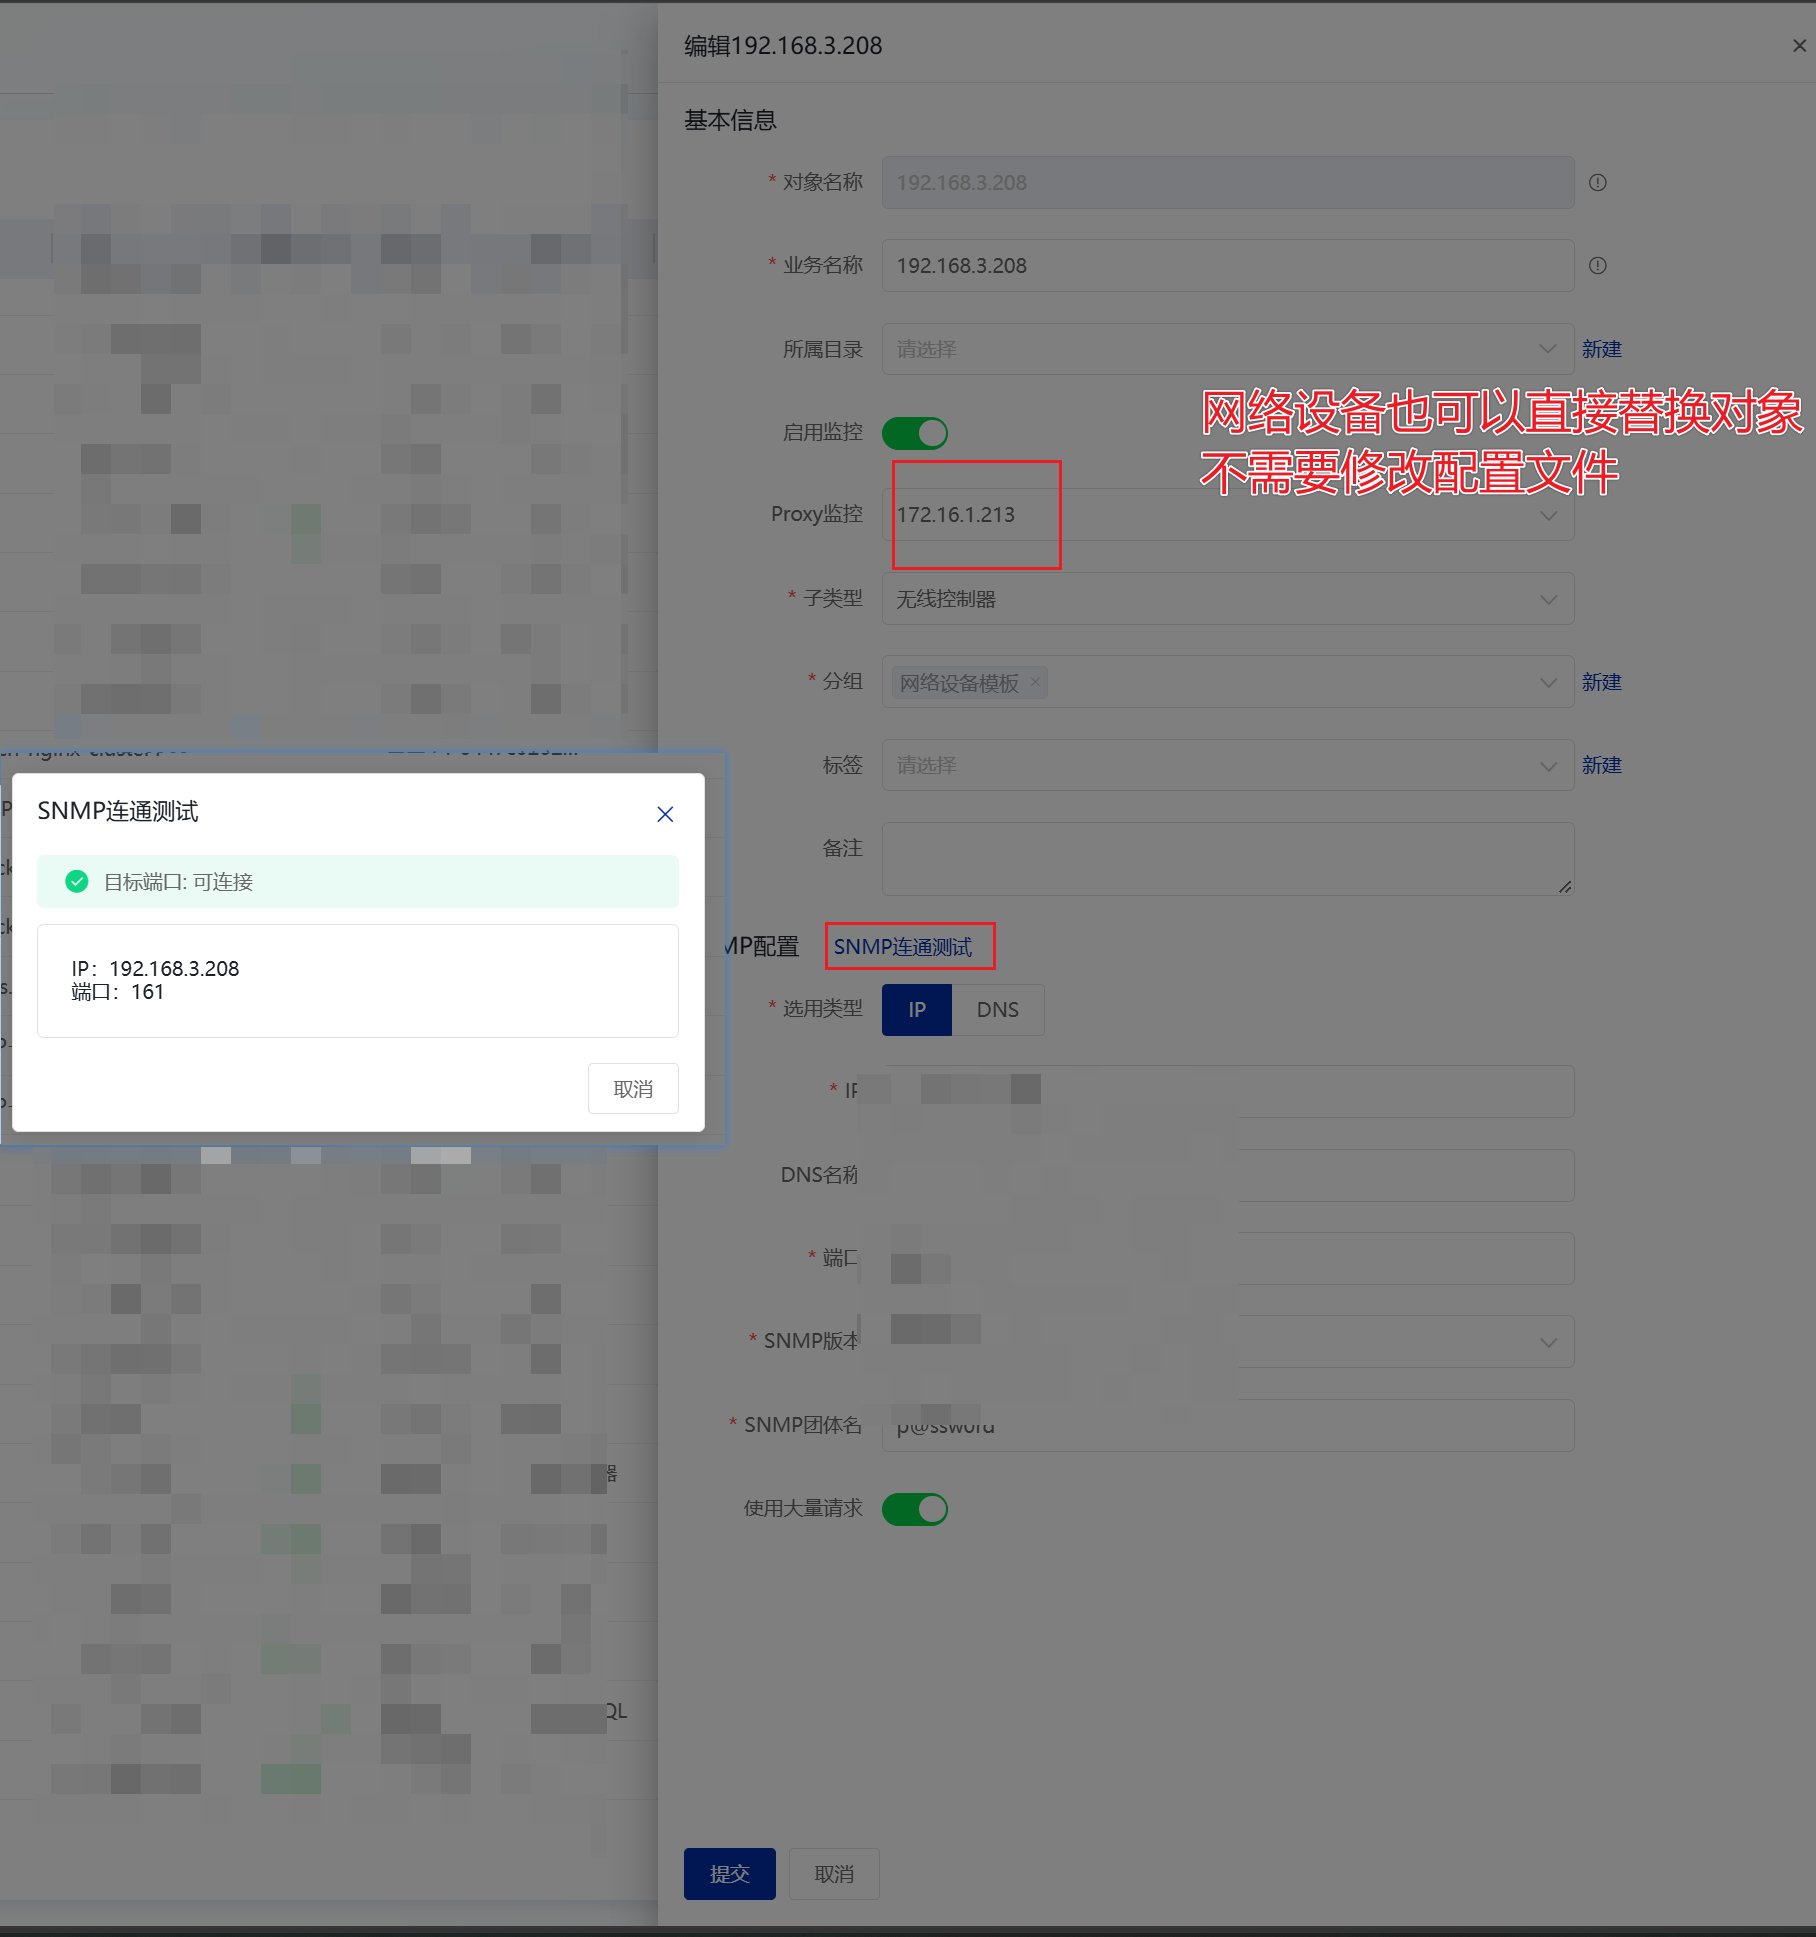
 ## 十,其他对象(网络设备等)